You must first learn to photograph and then develop your creativity. Then, practice until you get it right. You can learn from your mistakes and improve your photography skills. You have many resources to help you get started. Here are some of them: a guide to learning about exposure, shutter speed, aperture, and depth of field. All of these concepts will be important as you start your journey in photography.
Exposure triangle
The Exposure Triangle shows the relationship between shutter speed and ISO in photography. It helps photographers understand the importance of these three factors. Because all three elements are interdependent, adjusting any one of them will have an impact on the others. Exposure of an image depends upon the three factors. Each one has an effect on the other.
Photography is only possible if you understand the exposure triangle. Once you are familiar with the exposure triangle, it will become second-nature. You will eventually be capable of capturing a perfect exposure without ever thinking about it.
Shutter speed
When you are just starting out in photography, shutter speed is something that you should be aware of. It will determine the speed with which the subject moves and the intensity of the light. Sports photographers typically use a shutter speed of 1/1000 for action shots. Children and pets move slowly so a 1/250 shutter speed is usually sufficient. Blur is an unwanted side effect that results from faster shutter speeds.

Because it can affect how images are exposed and shutter speed, shutter speed is a crucial aspect of photography. An increased shutter speed will stop overexposure. This will lead to blurred images. However, it will also allow you to freeze movement, allowing you to create sharp images.
Aperture
Photography is a skill that requires a good understanding of the principles and how to adjust aperture. The aperture controls how much light is allowed into the camera. It also allows you to adjust the depth of field as well as the colors. This tool is useful for taking better photos in various settings.
Aperture is one of the core elements of the exposure triangle in photography. Learning the basics of aperture, like shutter speed and ISO will allow you to capture better images and be more creative. You'll learn the basic concepts in this video, which will guide you in learning to control this fundamental parameter.
Depth of field
The first step in learning how to control the depth of field of a photograph is to adjust the aperture on your camera. The aperture can be increased to produce a shallower depth, while it can be decreased to produce a deeper field. The aperture refers the hole that allows light in the camera lens.
When first encountered, the fstop numbering on your digital camera can seem confusing. Therefore, it is important to understand how it works. Knowing this relationship will allow you to select the right aperture for various situations.
Camera modes
Beginning photographers can improve their photos with a variety of camera modes. You can also use different settings to achieve different results. Understanding which setting is best for you will allow you to take better photos. For landscape mode, you can capture wide-open scenes in the landscape, while portrait mode is perfect for taking headshots and other moving scenes. Generally, landscape mode will allow you to use a smaller aperture, which allows you to capture more of the scene in focus at once. It also allows for faster shutter speeds, which can help freeze movement.
Manual mode is another option for beginners photographers. It allows you to manually adjust the shutter speed and ISO. For fast moving subjects such as birds flying, manual mode is a great option. This mode is great for capturing motion within clouds and moving water.
FAQ
Is digital photography hard?
Digital photography isn’t as easy as you may think. It takes time and effort to learn how to use the tools properly. For different shots, you need to know which settings to use. You can learn best by doing. Practice makes perfect.
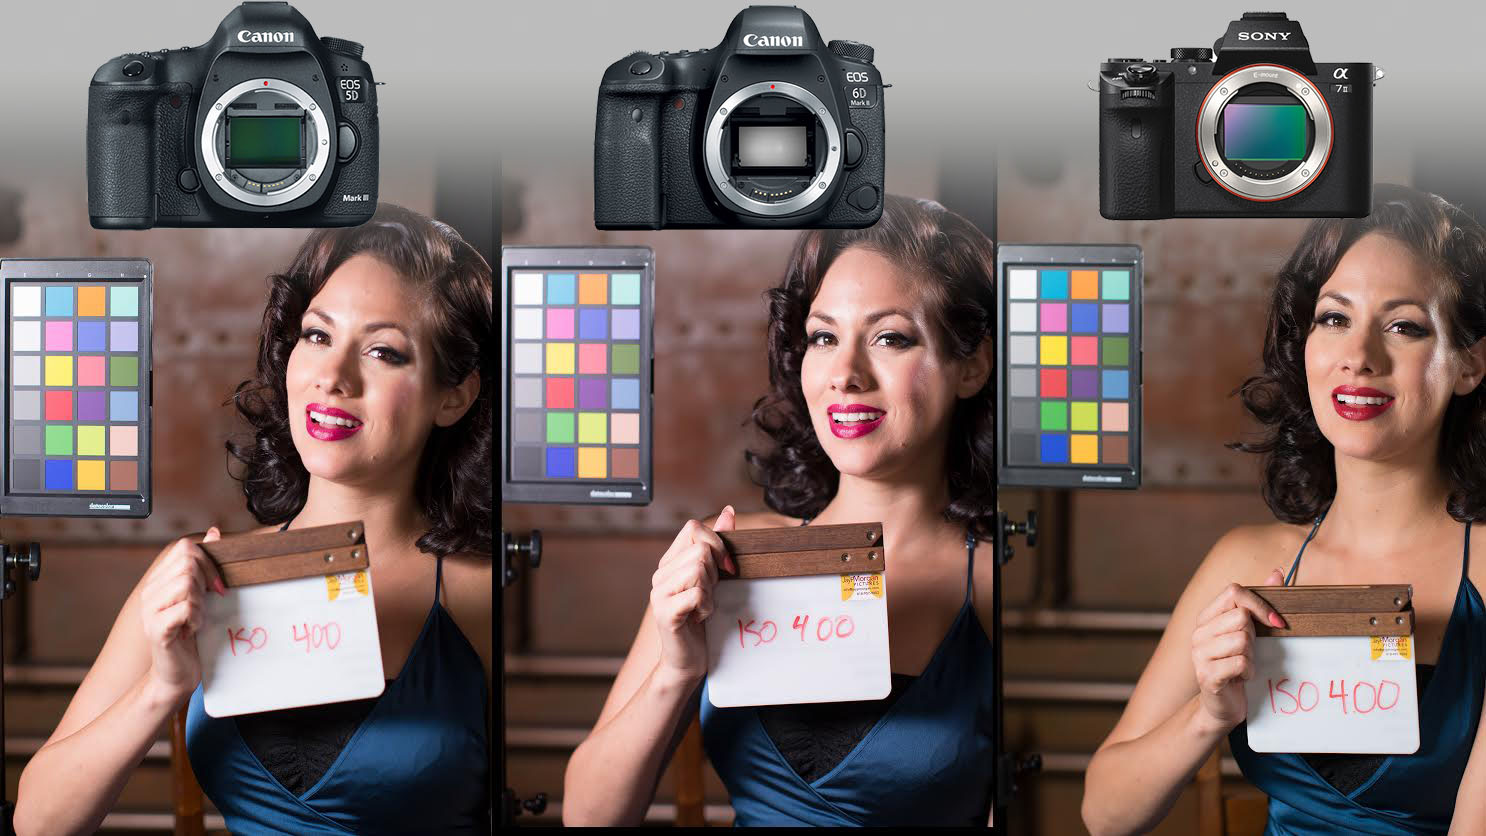
What camera is the best for beginners, and why?
The best camera to use for beginners is dependent on your needs, budget, and skill level.
For instance, you could choose a point & shoot digital camera if your goal is to save some money. These cameras can be very versatile, but they offer excellent quality.
Digital Single Lens Reflex (DSLR) cameras can be equipped with interchangeable lenses that enable you to shoot different types. They usually cost more than point-and-shoots but give you much greater flexibility.
For those new to photography, a beginner's kit is a great place to start. Everything you need, including a flash, tripod, memory card and camera body, will be included in the one-pack.
Do not forget to get extra batteries!
How do you get started in digital photography
First, you need to decide what type of camera is best for you when you first start digital photography. You have several options, including DSLRs (digital single lens reflex cameras), point-and-shoot compact cameras, camcorders, and smartphones. Each one has its advantages and disadvantages. DSLR cameras, however, are larger and heavier than most other types of cameras. Point-and shoot cameras are lighter and smaller than other types of cameras and can often be set up automatically for certain situations. Camcorders are capable of recording excellent video quality and can also be used to take still photos. Smartphones are small, light, and easy to carry around and offer great image quality and many advanced features such as GPS mapping, music playback, and Internet browsing.
Once you've made a decision about the type and model of camera you want, then you must decide whether you want to buy it new or used. Cameras that have been used in recent years can often be found for a reasonable price. Newer models cost more, as manufacturers spend a lot of money on developing new technology.
Next, you need to purchase lenses. Lenses are a critical part of determining the quality your photos. You can adjust the focal length of the lens to allow you to zoom in on the scene without losing focus. Some lenses come with built-in flash units while others need external flash units. There is a wide selection of lenses available from different brands. Each lens has its own characteristics.
Finally, you will need to invest in memory cards. Memory cards store pictures taken by your camera. You can store hundreds, thousands, or even more pictures depending on the size of the card. If you plan to shoot lots of pictures, you will need multiple memory cards.
How do I learn to take photos on my own?
There are many ways you can learn to take great pictures. There are several options. You can read a book, go to a class, or join an internet community. But if you want to master the art of taking pictures, there's nothing better than doing it yourself! So you can decide what goes into each picture. And as long as you keep learning, you'll always improve.
The best thing about digital photography? You don't need any expensive equipment. All you need is a computer with internet access and a camera. The rest is up for you.
Here are some tips to get your feet wet:
-
Get familiar with your camera's manual settings.
-
Learn how to use the controls.
-
Take many photos.
-
These should be edited.
-
These are yours to share.
-
Keep practicing.
-
Experiment.
-
You can try different perspectives and angles.
-
Use light sources creatively.
-
Practice makes perfect.
-
Don't be afraid to fail.
-
Be patient.
-
Have fun!
Why use Light Room to enhance your pictures?
Start early to get the best photos possible for your project. It's better to take as much as possible, then select the best.
Lightroom allows you to do this by letting you see how different settings affect each photo. You can also adjust these settings on-the-fly without going back into Photoshop. This lets you quickly experiment with what looks great and what doesn't.
Statistics
- In this case, 100% of readers who voted found the article helpful, earning it our reader-approved status. (wikihow.com)
- The second easiest way to get blurry photos 100% of the time is to use a cheap filter on the front of your lens. (photographylife.com)
- This article received 13 testimonials, and 100% of readers who voted found it helpful, earning it our reader-approved status. (wikihow.com)
- There are people out there who will pick at flaws they can only see in 100% crops of your photos. (wikihow.com)
External Links
How To
How to take photographs in low lighting conditions
Low-light photography refers to taking photos in dimly lit or dark environments. It requires special equipment. The main challenges in this field include controlling exposure, whitebalance, and sharpness. There are two types of low light photography: flash and ambient. Flash photography works well when there is sufficient light around you. A flash is required if there isn’t enough light. Without a flash, it is possible to get a poor picture if the subject is indoors and not outdoors. If you don't want to use a flash, try shooting at night during the moonlit hours. This way, you'll get some nice colors and shadows. Another option is taking photos at twilight. Twilight is the time when the sun has set and there's still daylight.
You might also be interested in long exposures. Long exposures enable you to take images even after your shutter has been open for several seconds. The shutter must be closed so that the camera only records light that hits the sensor. This light continues to fall onto a photo sensor throughout a prolonged exposure. The shutter was not opened, so no new light entered the lens. You will see very little movement as a result. To ensure you're getting a clear image, turn off any automatic settings like autofocus and auto exposure. Before you begin shooting, adjust your ISO setting. An ISO setting 200 gives you more control over how bright or dim your image appears. The shutter button should be pressed quickly when you are ready to take the photo. The shutter will close completely. Keep the shutter button pressed down until the last second. By holding down the shutter button, you prevent additional light from entering the camera. Once you take the shot, wait a while before you release the shutter. This allows your camera to process the picture. While you wait, your photos will be displayed on your computer's screen. When you are happy with your photos, save them to the computer.